Odd little projects are always a good idea, because good ideas come from experimentation, experimentation that may not have been done otherwise. My Melt madness of late has been one such project, and it’s really helped me with a problem I’ve had for a long time with Deathzap.
Two things I’ve loved about playing my own games over the years, one is Deathzap 3 the other is The Simple Toy Soldier Game. Both are, I think, some of the best rules writing I’ve done. But when I’ve tried tinkering with them, adding more units, faction rules etc. they also break rather quickly, and by break I mean games get bogged down into nothingness. Now if you want to experience something of what trench warfare must have felt like in real time then I guess that sort of thing is for you. However really slow, painfully slow games are no fun, even less fun solo. But Melt gave me the idea that solved that problem.

Deathzap 3 had a simple premise, all your units have shields, when you take hits your shields degrade, if your shields run out you start taking casualties. You can recharge your shields to keep your guys alive, but do that and you can’t move or shoot for that turn. Simple risk/reward. The Simple Toy Soldier Game has your guys take danger tokens from enemy fire, when a guy is activated they get D6 actions, move 1” for an action, take 1 shot, or remove 1 danger token. If your guy can’t remove all of their danger before their activation is over then they die (or in other versions if your guy doesn’t roll high enough to remove all danger immediately before moving and shooting then they die).
You can probably tell from all that I’m a fan of fire and movement tactics, and somewhat accurately (in my own settings at least) representing them. Probably due to my obsession with the Brothers In Arms video game series as a teen.
To counter than, I’m always after fun and fast games. Featherstone’s Close Little Wars is a great set of rules to play, and again, going solo play fast is always good.
So to put it simply… I like fire and movement, I like fast games, I’m after that Holy Grail of quick and easy while giving that tactical depth. I’ve come close in the past, but never quite gotten it right, so here’s my jokingly titled ‘Deathmelt’, a go at Deathzap Skirnishing, based funnily enough on Deathzap 1 as a core, with elements of 3 and Melt thrown in…

DEATHMELT
DEPLOYMENT
Each player rolls a die, the higher roller decides which edge of the battlefield is their base line and deploys first, their opponent then deploys on the opposite side. At the start of the game all figures must be within 6” of their board edge. The game then is played in turns, each turn being made up of 5 phases and played in the order listed below. If you are playing an advanced game, roll for objectives after the impetus roll for the first turn.
The game automatically ends at the end of the 5th turn and a winner is determined.
LEADERS
Select one figure in your force to be your Leader. This is only for the purpose of objectives and has no other effect on the game (yet).
PHASE 1: IMPETUS
Each player rolls a die, adding 1 for each panicked figure on the opposing side. The higher roller has the impetus for the turn.
PHASE 2: HUNKER DOWN
During this phase players determine which of their figures will Hunker Down for the turn. The player with the impetus declares which of their figures (if any) will Hunker Down first. A figure that Hunkers Down takes no further part in the turn, they will not move or shoot, however they will fight if charged in melee. A figure that Hunkers Down immediately loses all Danger Tokens currently on them.
PHASE 3: MOVEMENT
The side with the impetus moves their figures first. Infantry, Monsters and Vehicles can move up to 9”. Light Vehicles, Beasts and Big Beasts can move 12”. Panicked figures cannot move towards the enemy. Figures in melee combat (base to base contact with enemies) cannot move.
PHASE 4: SHOOTING
During the shooting phase both sides shoot, with the player with the impetus shooting with all of their figures first and then the other player shooting with all of their figures second. Casualties are only removed at the end of the phase, so any casualties caused by the first player’s firing can fire when it is the other player’s turn to do so, also figures panicked during this phase do not count as panicked when shooting within this phase.
Units engaged in melee combat cannot shoot or be shot at.
Panicked figures only hit on rolls of 6 regardless of their quality or the target’s cover.
Figure’s can split their fire across multiple targets.
First roll the number of dice (shots) to hit for the gun firing:
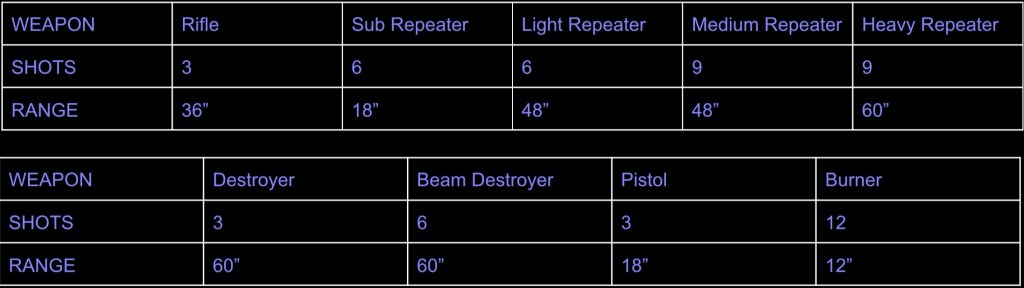
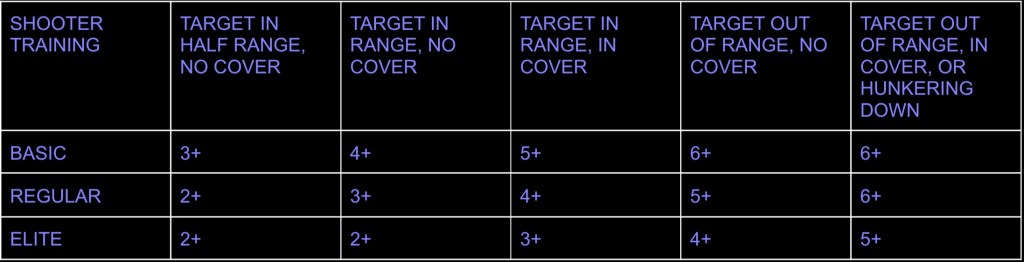
Hits are scored according to the table below:
Then for each hit roll to penetrate the target figure’s shield. Each penetrating hit results in a Danger Token being given on the target.

If a shooter penetrates a target’s shields, the target takes an armour save. Compare the current amount of Danger Tokens on the target to their Armour stat.

Typically unarmoured infantry or civilians count as having armour 1, a standard infantryman’s or beasts armour is 2, elite infantry have armour 3, Swordsport armour and big beasts may be 4 or 5, and vehicles/monsters typically are 6+.
If the target’s armour is double or more than double the amount of Danger Tokens then they save on a 2+.
If the target’s armour is larger but not double then they save on a 3+.
If the target’s armour is equal to the danger then they save on a 4+.
If the target’s armour is less than, but more than half, then they save on a 5+
And if the target’s armour is half or less than half of the total number of Danger Tokens on them then they save on a 6+.
If the save is passed with a roll of 2-5, then the target carries on as normal, but retains all Danger Tokens. If the save is passed with a roll of 6, then the target is also panicked.
If the save is failed then the target is a casualty. If the target is a vehicle or monster they roll on the vehicle/monster damage table instead of becoming a casualty.
PHASE: Melee Combat
Roll a number of dice per figure in the combat as per their type. The figure that scores the highest number of successes kills their opponent. In the case of a tie the figure that initiated the combat wins.
Figures score successes based on their training:
Elite – 3+, Regular – 4+, Basic 5+, Any Panicked or Hunkering Down Figures – 6+,
Each roll of 6 allows an additional attack to be rolled.
TYPE/ ATTACKS
Infantry 3
Beast 5
Big Beast 8
Light Vehicle 5
Vehicle 8
Monster 12
If a figure fights multiple opponents in a single phase, each additional opponent gains attacks. Their 2nd opponent gains 1 attack, their 3rd opponent gains 2 attacks, their 4th 3, and so on…
PHASE 4) Morale
Roll a die for each panicked figure. If the figure is basic on a 5+ they are no longer panicked, if they are regular on a 4+ they are no longer panicked, and if the figure is elite on a 3+ they are no longer panicked.
If the figure fails the roll they make a full move towards their deployment zone, intending to move off of the table. If the figure moves off of the table they are considered a casualty for the purposes of objectives.

Winning
For basic games a side wins when the other side has only panicked figures remaining. For advanced games, roll for two objectives, one from each table, each objective scores victory points, and at the end of 5 turns when the game automatically ends. The player with the most victory points wins.
OBJECTIVES 1
1-2
Assassinate – 3VP for killing your opponent’s leader.
3-4
Hard Hitters – 3VP for being the first to eliminate half your opponents force, vehicles and monsters count as 3 figures.
5-6
Extermination – 1VP per 3 enemy casualties, or single vehicle or monster.
OBJECTIVES 2
1-2
Hold – 1VP per board quarter you have figures in at the end of the game.
3-4
Push – 3VP for having your leader in your opponent’s deployment zone at the end of the game.
5-6
MacGuffin – A counter is placed in the centre of the table. If one side can collect it and carry it to their deployment zone and keep it there till the end of the game, then they get 3VP. The MacGuffin is moved with any figure in base to base contact with it.

Oh the horror!!!! 🙂
Regards, Chris.
The melting babies, that is – not the rules. 🙂
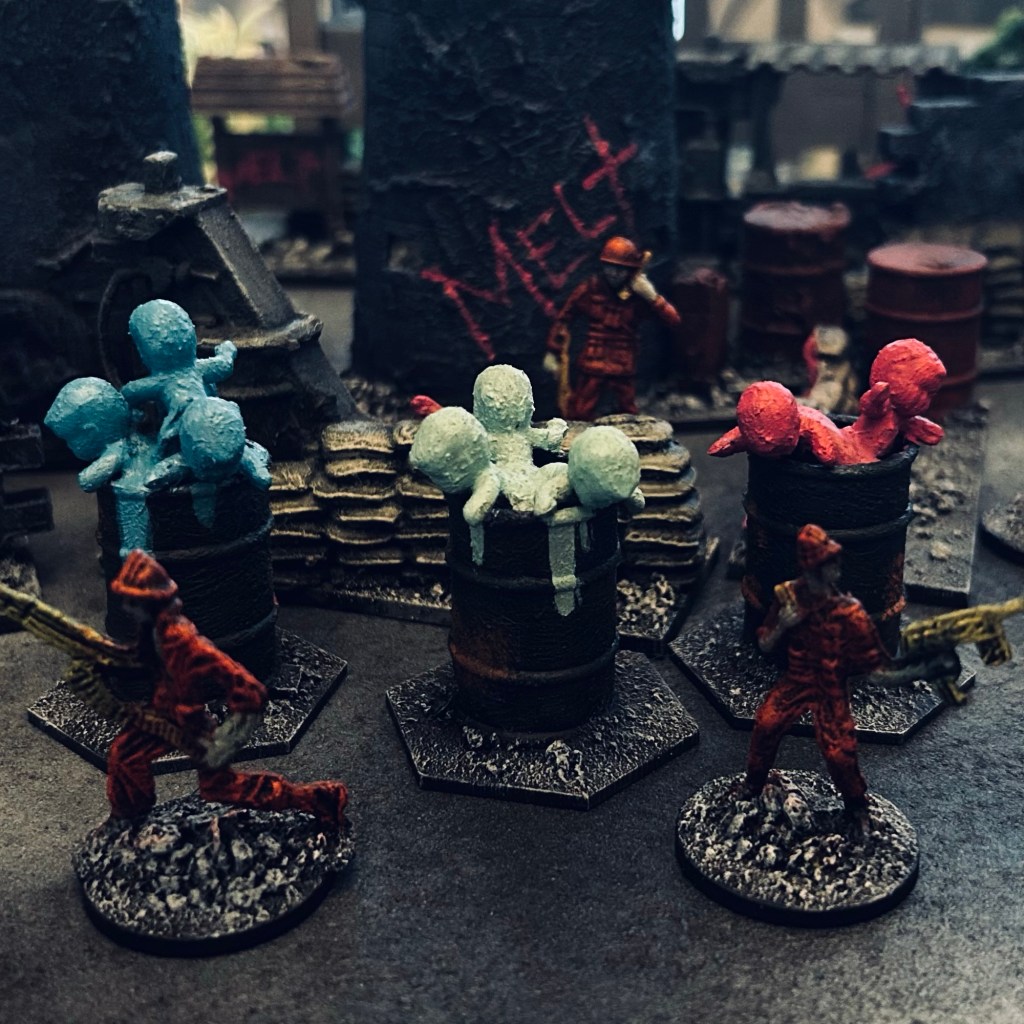
I had this moment of madness when I assumed that one side was the melting babies who would be remarkably resistant to firearms and if they survived a round of combat, their opponent started melting. Which is embarrassing if the opponent is a tank 🙂
That does sound like a moment of madness lol. I was primarily using the barrel babies as objective markers. But I also suspect that they’re not real babies, they’re a kind of sentient plastic, and can be particularly vicious if let loose.
This has to be explored further 🙂